How to Add A popup Download Timer Button in Blogger
In this article, I will show you how you can add a Countdown Timer button to the Blogger website. So, whenever someone clicks on the download button, it will show a popup window with 20 seconds of a countdown timer and you can place AdSense ads on it.
So, in this way, you can keep your visitors longer on your Blog post and reduce your Bounce rate and increase the overall dwell time. So, it helps increase engagement in the website and helps in SEO.
To Add a Popup download Timer Button in Blogger, follow the below steps.
1. Go to the Blogger dashboard and Open a Blog post.
2. Now paste the HTML code and replace the Download button link, Adsense Publisher id, and ad slot code on it.
<p style="text-align: center;">
  <a class="button" href="#" id="get-download">
    <i class='icon download'></i>Download
  </a>
</p>

<div id="PopupDownload" class="modal">
  <div class="Popup_container"></div>
  <div class="modal-dialog">
    <div class="Popup_content">
      <div class="adpop-top">
        <h2 style="margin: 0px;">Download Your File</h2>
        <div class="ad-pop__close">
          <svg style="height: 25px; width: 25px; fill: black;" viewBox="0 0 512 512" xmlns="http://www.w3.org/2000/svg">
            <path d="M278.6 256l68.2-68.2c6.2-6.2 6.2-16.4 0-22.6-6.2-6.2-16.4-6.2-22.6 0L256 233.4l-68.2-68.2c-6.2-6.2-16.4-6.2-22.6 0-3.1 3.1-4.7 7.2-4.7 11.3 0 4.1 1.6 8.2 4.7 11.3l68.2 68.2-68.2 68.2c-3.1 3.1-4.7 7.2-4.7 11.3 0 4.1 1.6 8.2 4.7 11.3 6.2 6.2 16.4 6.2 22.6 0l68.2-68.2 68.2 68.2c6.2 6.2 16.4 6.2 22.6 0 6.2-6.2 6.2-16.4 0-22.6L278.6 256z"></path>
          </svg>
        </div>
      </div>

      <br />
      <div style="width: 660px;">
        <ins class="adsbygoogle"
          style="display:block"
          data-ad-client="ca-pub-xxxxxxxxxxxx"
          data-ad-slot="xxxxxxxxxxx"
          data-ad-format="auto"
          data-full-width-responsive="true">
        </ins>
        <script>
          (adsbygoogle = window.adsbygoogle || []).push({});
        </script>
      </div>
      <br />

      <a class="button" href="https://key2blogging.com/popup-download-timer-button-in-blogger/" id="Popup_Download_btn">
        <i class="icon download"></i>Download File
      </a>
    </div>
  </div>
</div>
3. Then copy the CSS & Javascript code and paste it above the </body> tag.
<b:if cond='data:view.isPost'>
<style>
    #Popup_Download_btn {
    display: inline-flex;
    align-items: center;
    justify-content: center;
    flex-wrap: wrap;
    margin-bottom: 10px;
    padding: 10px 20px;
    border-radius: 10px;
    font-size: 1rem;
    line-height: 1.3rem;
    background-color: #303e9f;
    color: #ffffff;
    font-weight: bold;
    text-decoration: none;
    cursor: pointer;
    border: none;
    transition: background 0.3s ease-in-out;
}

#Popup_Download_btn:hover {
    background-color: #1e2a80;
}

#Popup_Download_btn:active {
    background-color: #161e66;
}

/* Style for the icon inside the button */
#Popup_Download_btn i {
    margin-right: 8px;
    display: inline-block;
    vertical-align: middle;
}

/* Responsive adjustments */
@media (max-width: 767px) {
    #Popup_Download_btn {
        font-size: 0.9rem;
        padding: 8px 16px;
    }
}

    .Popup_content{
    display: flex;
    margin: 0 auto;
    position: relative;
    flex-direction: column;
    justify-content: center;
    align-items: flex-start;
    }

    .adpop-top {
      height: 40px;
      width: 100%;
      border-bottom: 1px #E5E5E5 solid;
      display: flex;
      justify-content: space-between;
      align-items: center;
      padding: 0 10px;
    }


    .modal {
      position: fixed;
      top: 0;
      left: 0;
      width: 100%;
      height: 100%;
      background: rgba(0, 0, 0, 0.7);
      display: none;
      z-index: 999;
    }

    .Popup_container {
      position: absolute;
      top: 0;
      left: 0;
      width: 100%;
      height: 100%;
      cursor: pointer;
    }

    .modal-dialog {
    border-radius: 6px;
    border: 3px solid #0086f7;
    box-shadow: 2px 2px 0px 0px #0086f7;
    position: absolute;
    top: 50%;
    left: 50%;
    transform: translate(-50%, -50%);
    width: 90%;
    max-width: 660px;
    background: #fff;
    padding: 23px 27px;
    z-index: 1000;
}

    @media (max-width: 767px) {
      .modal-dialog {
        width: 95%;
      }
    }

    .ad-pop__close {
      width: 25px;
      height: 25px;
      cursor: pointer;
      position: fixed;
      right: 10px;
    }

    .icon {
      display: inline-block;
      vertical-align: middle;
      margin-right: 10px;
      width: 18px;
      height: 18px;
      background-size: cover;
    }

    .button .icon.download {
      background-image: url("data:image/svg+xml,<svg xmlns='http://www.w3.org/2000/svg' viewBox='0 0 24 24' fill='none' stroke='%23fefefe' stroke-linecap='round' stroke-linejoin='round' stroke-width='1.5'><path d='M3 17v3a2 2 0 0 0 2 2h14a2 2 0 0 0 2-2v-3'/><polyline points='8 12 12 16 16 12'/><line x1='12' x2='12' y1='2' y2='16'/></svg>");
    }
  </style>

<script>
//<![CDATA[
document.addEventListener("DOMContentLoaded", function () {
    var modal = document.getElementById("PopupDownload");
    var openButton = document.getElementById("get-download");
    var closeButton = document.querySelector(".ad-pop__close");
    var modalBackground = document.querySelector(".Popup_container");
    var downloadButton = document.getElementById("Popup_Download_btn");

    var counter = 10;  // Timer countdown
    var countdownText = document.createElement("span"); // Creates countdown message
    countdownText.innerHTML = "Please Wait " + counter + " sec...";
    countdownText.style.fontWeight = "bold";
    countdownText.style.display = "block"; // Initially visible
    downloadButton.style.display = "none"; // Hide download button initially
    downloadButton.parentNode.insertBefore(countdownText, downloadButton);

    // Hide modal initially
    modal.style.display = "none";

    // Open popup when clicking the download button
    openButton.addEventListener("click", function (event) {
        event.preventDefault(); // Prevent default anchor behavior
        modal.style.display = "block";
        startDownloadTimer();
    });

    function startDownloadTimer() {
        counter = 10; // Reset counter
        countdownText.innerHTML = "Please Wait " + counter + " sec...";
        countdownText.style.display = "block";
        downloadButton.style.display = "none"; // Hide download button

        var interval = setInterval(function () {
            counter--;
            countdownText.innerHTML = "Please Wait " + counter + " sec...";

            if (counter <= 0) {
                clearInterval(interval);
                countdownText.style.display = "none"; // Hide countdown message
                downloadButton.style.display = "inline-block"; // Show download button
            }
        }, 1000);
    }

    // Close modal when clicking the close button
    closeButton.addEventListener("click", function () {
        modal.style.display = "none";
    });

    // Close modal when clicking outside the popup
    modalBackground.addEventListener("click", function () {
        modal.style.display = "none";
    });
});
//]]>
</script>
</b:if>
4. Now your Popup download Timer button will work on the Blogger website.
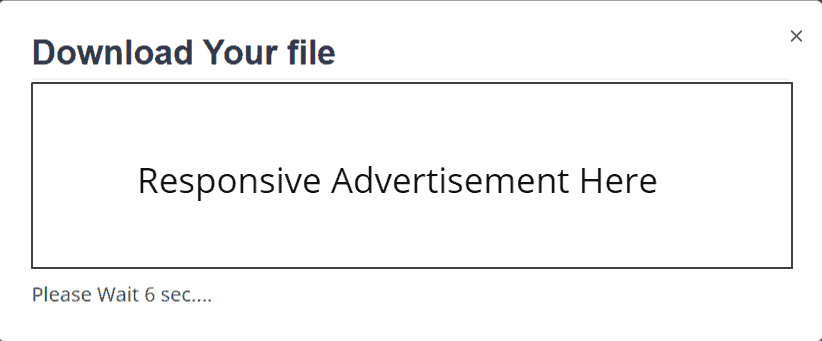
This download popup is fully responsive and works well on all types of devices.

Here, note that this timer button code will only load on the Post page only as we have set the if condition only. if you want to use it on pages then you can remove it from your code.
If you don’t know how the if condition works in Blogger then you can refer to this article.
If you want to change the countdown timer time then you can change the value in the Javascript code. Find this code on JS. [ var counter = 20; ]
Here, the 20 value refers to 20sec, you can change the value according to your need.
Benefits of Download Timer
I hope you have successfully added a Download Timer button to your Blogger website.
Note: If this code is not working properly on your theme then you can use the alternative popup download timer code given below.
If you face any problems during the installation of the Countdown timer button, you can ask me in the comment section.
Don’t forget to join our Telegram Group and YouTube channel.
Read Also: How to Add Mailchimp SignUp Form in Blogger


Pop up box and all are working properly. But there is one issue. The pop-up box does not contain a close button. Therefor users can not close the pop-up box after completing the download. Can you fix it and update the code? Thanks.
Updated the code
why the button only appear once?
Hi. The close button does not work. How to fix it?