How to Add a Free shipping Progress Bar in Woocommerce
Free shipping is one of the biggest reasons customers decide to complete a purchase. In fact, many shoppers add extra products to their cart just to qualify for free shipping.
A simple Free Shipping Progress Bar can encourage customers to spend a little more by showing exactly how much they need to unlock free shipping. This not only improves the shopping experience but also helps increase your store’s Average Order Value (AOV).
In this tutorial, I’ll show you two simple ways to add a Free Shipping Progress Bar in WooCommerce:
- Method 1: Using a custom PHP code snippet
- Method 2: Using a dedicated WooCommerce plugin (Recommended)
Let’s get started.

Why Add a Free Shipping Progress Bar?
Imagine your store offers free shipping on orders above $100.
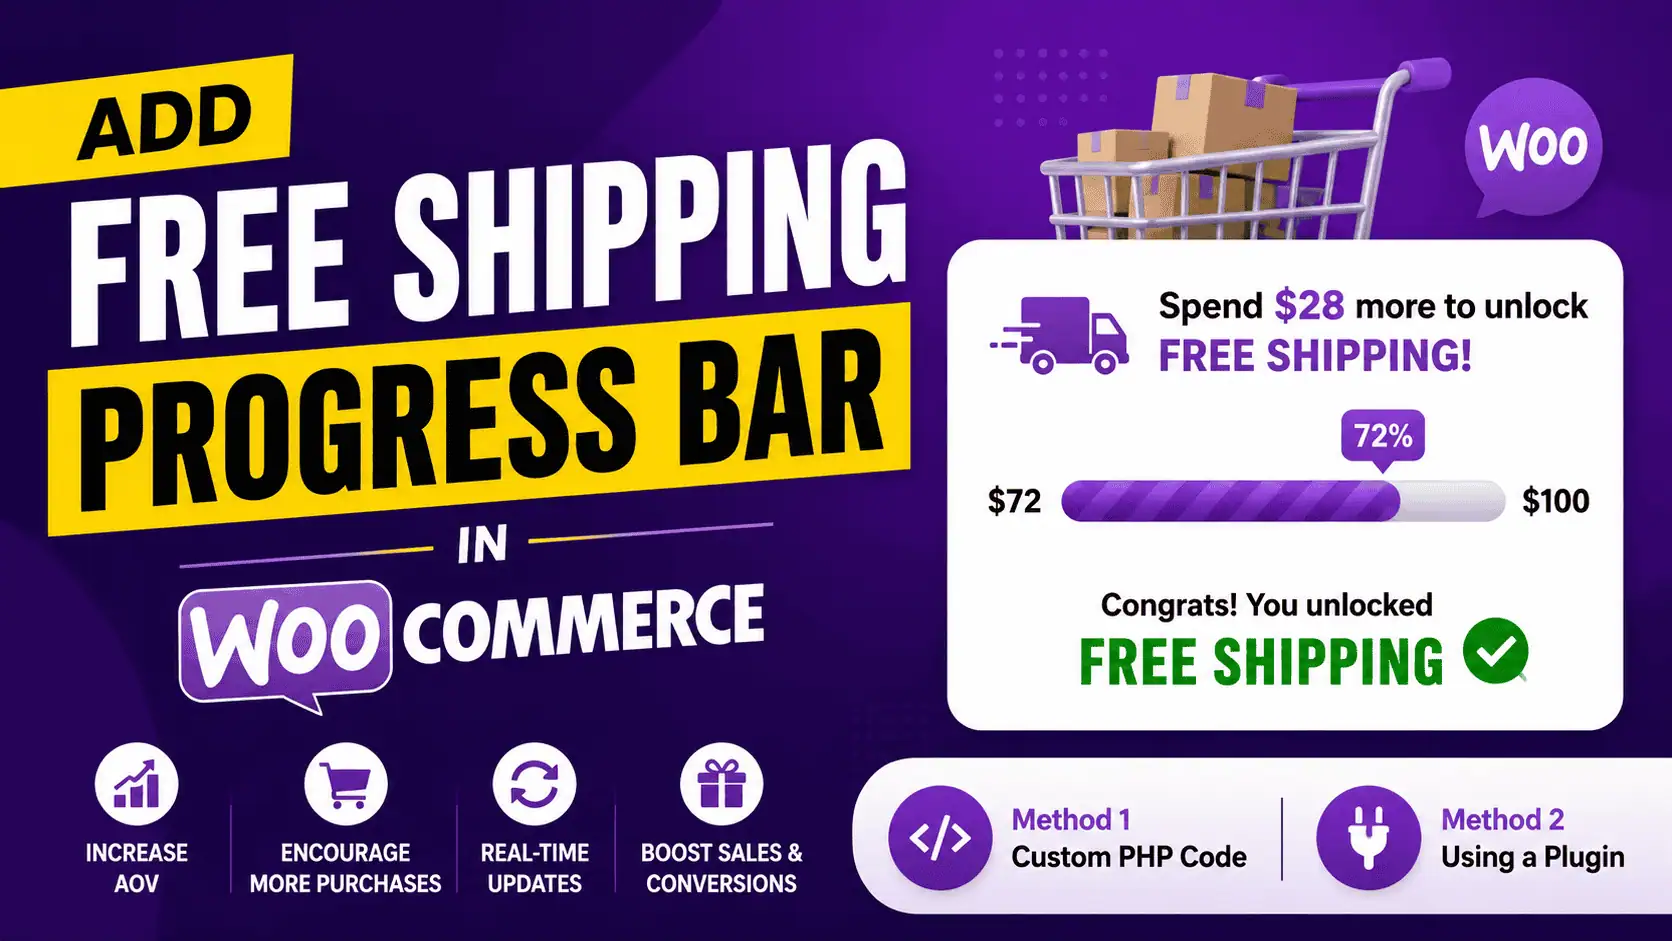
If a customer has products worth $72 in their cart, they may not know they’re only $28 away from free shipping.
Instead of leaving them guessing, a progress bar displays something like:
🚚 Spend $28 more to unlock FREE Shipping
As customers add more products, the progress bar updates automatically.
Once they reach the minimum amount, they’ll see a success message like:
🎉 Congratulations! You’ve unlocked FREE Shipping.
This small feature can make a huge difference in your WooCommerce sales.
Some major benefits include:
- Increase Average Order Value (AOV)
- Encourage customers to buy additional products
- Improve shopping experience
- Reduce cart abandonment
- Increase conversion rates
Before You Begin
Before adding a progress bar, make sure you’ve already configured Free Shipping in WooCommerce.
Go to:
WooCommerce → Settings → Shipping → Shipping Zones
Open your shipping zone and configure the Free Shipping method with a minimum order amount.
For example:
Minimum order amount: $100
Once this is configured, you’re ready to continue.
Method 1: Add Free Shipping Progress Bar Using Custom PHP Code
If you don’t want to install another plugin, you can simply add a PHP snippet to your website.
This method is perfect if you only need a basic progress bar on the Cart page.
Step 1: Copy the PHP Code
Copy the PHP code provided below and add it to your website. The code automatically detects the free shipping minimum amount from your WooCommerce shipping zone and displays a progress bar above the cart table.
It calculates the customer’s cart subtotal, shows the remaining amount needed for free shipping, and changes the message automatically once the target is reached.
The included CSS styles create a clean, responsive progress bar with different colors for the normal and completed states.
<?php
/**
 * WooCommerce Free Shipping Progress Bar
 * Full Width Above Cart Table
 */

if ( ! defined( 'ABSPATH' ) ) {
	exit;
}

/**
 * Get Free Shipping Minimum Amount
 */
function k2b_get_free_shipping_minimum() {

	if ( ! WC()->cart ) {
		return false;
	}

	$packages = WC()->shipping()->get_packages();

	if ( empty( $packages ) ) {
		return false;
	}

	foreach ( $packages as $package ) {

		$zone = wc_get_shipping_zone( $package );

		foreach ( $zone->get_shipping_methods( true ) as $method ) {

			if ( 'free_shipping' !== $method->id ) {
				continue;
			}

			$settings = $method->instance_settings;

			if (
				isset( $settings['requires'] ) &&
				in_array( $settings['requires'], array( 'min_amount', 'either', 'both' ), true )
			) {

				return (float) $settings['min_amount'];
			}
		}
	}

	return false;
}


/**
 * Progress Bar
 */
function k2b_free_shipping_progress_bar() {

	if ( ! is_cart() ) {
		return;
	}

	$minimum = k2b_get_free_shipping_minimum();

	if ( ! $minimum ) {
		return;
	}

	$subtotal = WC()->cart->get_displayed_subtotal();

	$remaining = max( 0, $minimum - $subtotal );

	$percentage = min( 100, ( $subtotal / $minimum ) * 100 );

	?>

	<div class="k2b-free-shipping-bar">

		<?php if ( $remaining > 0 ) : ?>

			<div class="k2b-message">
				🚚 Spend <strong><?php echo wc_price( $remaining ); ?></strong> more to unlock <strong>FREE Shipping</strong>
			</div>

		<?php else : ?>

			<div class="k2b-message success">
				🎉 Congratulations! You unlocked FREE Shipping.
			</div>

		<?php endif; ?>

		<div class="k2b-progress">

			<div
				class="k2b-progress-fill <?php echo ( $remaining <= 0 ) ? 'completed' : ''; ?>"
				style="width:<?php echo esc_attr( $percentage ); ?>%;">
			</div>

		</div>

	</div>

	<?php
}

add_action( 'woocommerce_before_cart_table', 'k2b_free_shipping_progress_bar', 5 );


/**
 * Styles
 */
function k2b_free_shipping_styles() {
	?>
	<style>

	.k2b-free-shipping-bar{

		width:100%;
		background:#fff;
		border:1px solid #e6e6e6;
		border-radius:12px;
		padding:20px 24px;
		margin:20px 0;
		box-sizing:border-box;
		box-shadow:0 2px 8px rgba(0,0,0,.05);

	}

	.k2b-message{

		font-size:16px;
		font-weight:500;
		margin-bottom:14px;
		line-height:1.6;

	}

	.k2b-message strong{

		font-weight:700;

	}

	.k2b-message.success{

		color:#16a34a;

	}

	.k2b-progress{

		width:100%;
		height:12px;
		background:#ededed;
		border-radius:100px;
		overflow:hidden;

	}

	.k2b-progress-fill{

		height:100%;
		width:0;
		background:#3b82f6;
		border-radius:100px;
		transition:width .5s ease;

	}

	.k2b-progress-fill.completed{

		background:#22c55e;

	}

	@media(max-width:768px){

		.k2b-free-shipping-bar{

			padding:16px;
			margin:20px 0;
			border-radius:10px;

		}

		.k2b-message{

			font-size:15px;
			margin-bottom:12px;

		}

		.k2b-progress{

			height:10px;

		}

	}

	</style>

	<?php
}

add_action( 'wp_head', 'k2b_free_shipping_styles' );
Step 2: Add the Code
You can add the code using any of these methods:
- Code Snippets plugin
- WPCode plugin
- Your child theme’s
functions.phpfile
Using a code snippets plugin is recommended because it keeps your changes safe during theme updates.
Step 3: Save and Activate
Save the snippet and activate it.
Now visit your cart page.
You’ll see a beautiful progress bar displaying:
- Remaining amount
- Progress percentage
- Success message after reaching free shipping
That’s it.
Pros of Using the PHP Method
- Completely free
- Lightweight
- No extra plugin required
- Automatically reads WooCommerce free shipping settings
- Easy to customize with CSS
Limitations
Although this method works well, it has some limitations:
- Only appears where the code is added
- No settings page
- Requires editing code for customization
- Doesn’t include product recommendations
- No AJAX refresh on all WooCommerce events
If you want more features without writing code, the plugin method is a much better choice.
Method 2: Add Free Shipping Progress Bar Using a Plugin
If you’re looking for a complete solution, using a dedicated plugin is the easiest option.
The Free Shipping Progress Indicator for WooCommerce plugin automatically detects your WooCommerce free shipping threshold, so you never have to enter the minimum amount again. It reads the value directly from your configured WooCommerce shipping zones and uses the matching zone for the current customer. It also supports guests, AJAX cart updates, and multiple display locations.
Unlike many other plugins, there is no need to manually configure the free shipping amount inside the plugin.
Simply install it, enable it, and it starts working.
Key Features
The plugin comes with many useful features, including:
- Automatic free shipping threshold detection
- Supports multiple WooCommerce shipping zones
- Works for guest and logged-in users
- Animated progress bar
- Success message after unlocking free shipping
- AJAX updates without page reload
- Works on Cart page
- Works on Checkout page
- Works inside Mini Cart
- Supports WooCommerce Blocks
- Product recommendations to help customers reach the free shipping amount
- Confetti celebration effect after unlocking free shipping
- Fully responsive design
- Customizable messages
- Custom placement using WooCommerce hooks
- Easy settings page
How to Install the Plugin
- Download the plugin ZIP file.
- Go to WordPress Dashboard → Plugins → Add New.
- Click Upload Plugin.
- Select the ZIP file.
- Click Install Now.
- Activate the plugin.
After activation, open the plugin settings under the WooCommerce menu and configure the available options according to your store’s needs.
Customize the Progress Bar
You can customize various parts of the progress bar, such as:
This gives you much more flexibility than using a custom code snippet.
Which Method Should You Choose?
Choose the PHP Method if:
- You only need a simple progress bar.
- You’re comfortable adding PHP code.
- You don’t need extra customization.
- You want a lightweight solution.
Choose the Plugin if:
- You don’t want to edit code.
- You want automatic updates.
- You need AJAX support.
- You want product recommendations.
- You need more customization options.
- You want the progress bar on multiple WooCommerce pages.
For most WooCommerce store owners, the plugin is the better option because it is easier to manage and offers many additional features.
FAQs
Final Thoughts
Adding a Free Shipping Progress Bar is one of the easiest ways to encourage customers to spend a little more and qualify for free shipping. It creates a better shopping experience while helping you increase your store’s Average Order Value.
If you’re comfortable with code and only need a basic solution, the custom PHP method works well.
However, if you want a more professional solution with automatic threshold detection, AJAX updates, product recommendations, multiple display locations, and easy customization, the plugin method is the better long-term choice.
No matter which method you choose, adding a free shipping progress bar is a small improvement that can have a big impact on your WooCommerce sales.