How to Create an Image Gallery in Blogger
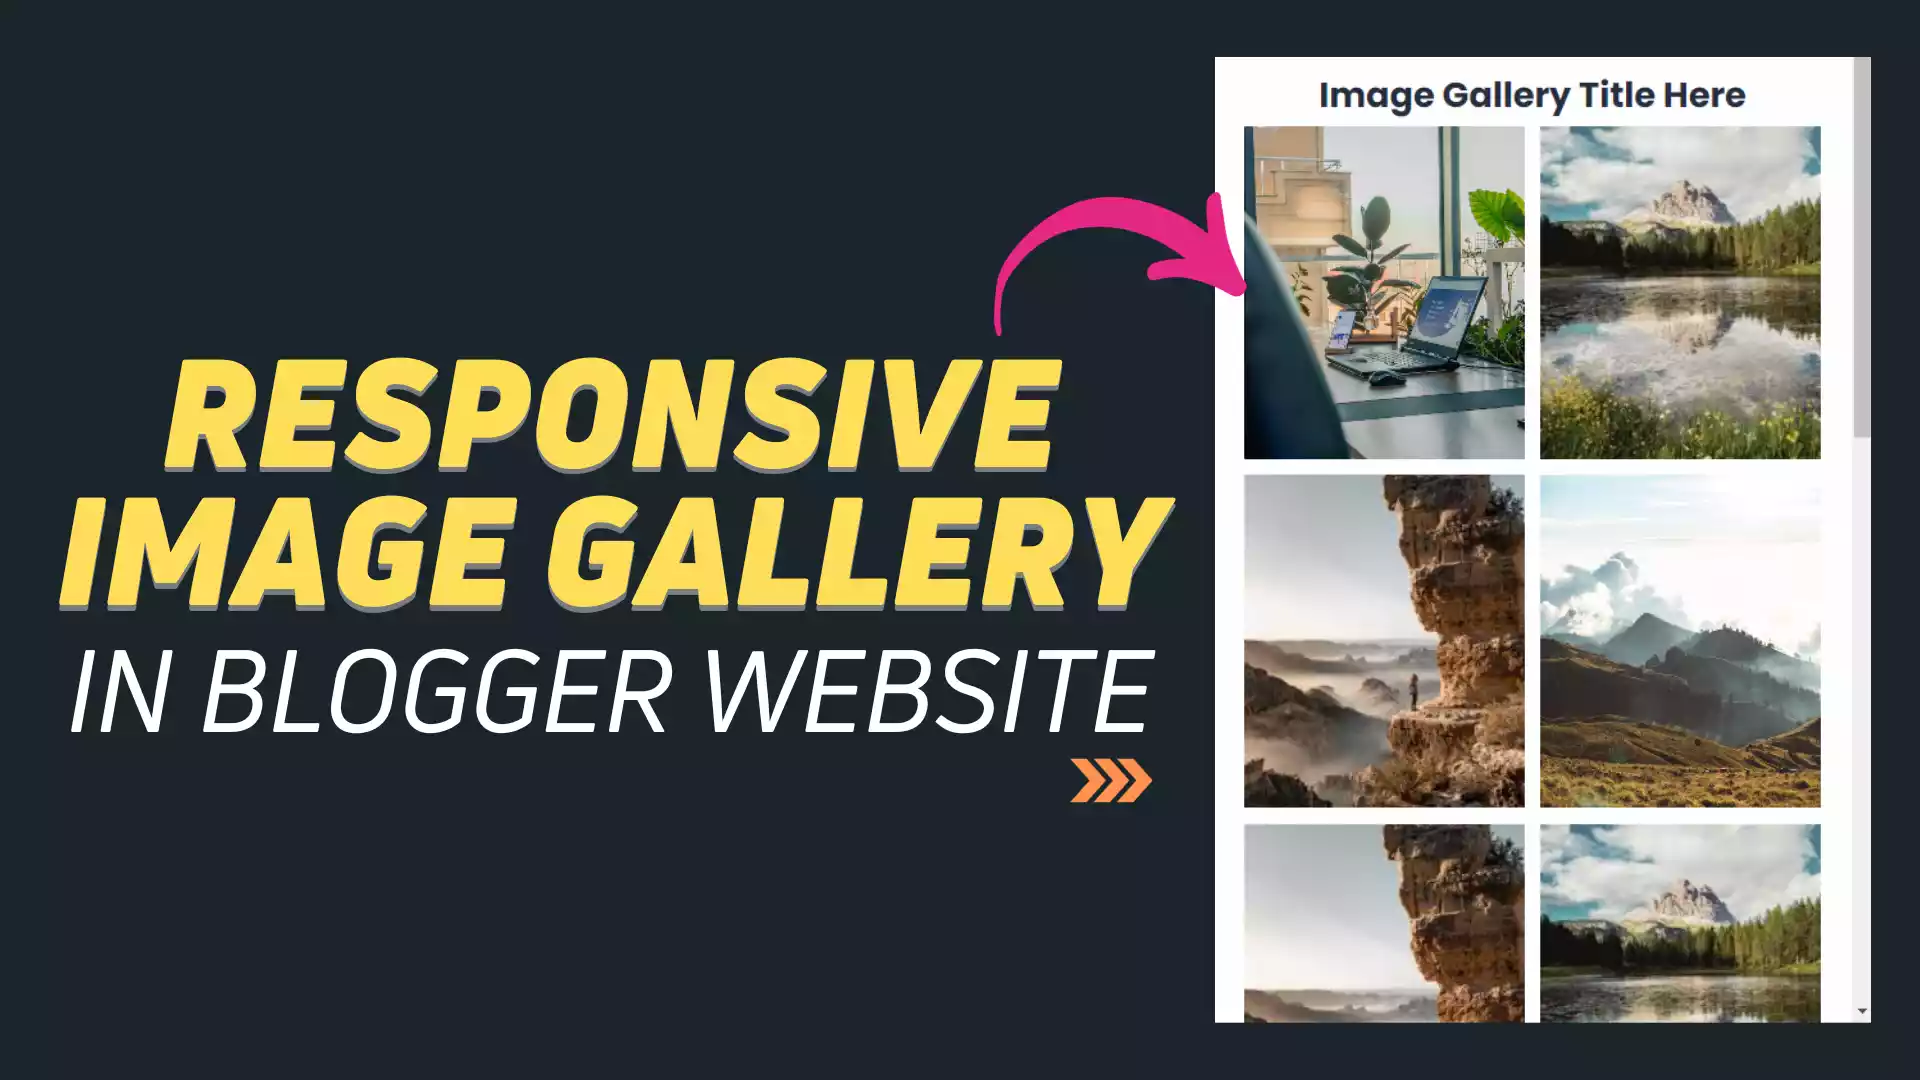
Do you know you can showcase all your images on the Blogger website using an Image Gallery? And it’s quite easy to add that. Just follow this Tutorial.
Here, I will show you how to add a responsive image gallery to the Blogger website. Here, We will use Pure HTML & CSS only. This is fully responsive on desktop, Tablet, and Mobile and doesn’t impact the Page speed as well.
Creating an image gallery in Blogger is a great way to showcase your photos or artwork. You can also use this to showcase testimonials, User reviews, Product images, services, etc.
Here’s a detailed step-by-step guide on how to create an image gallery in Blogger:

1. Open your Blogger Dashboard and Open any existing Blog post or page.
2. Now switch to HTML VIEW and Use the below code.
<div>
<h2 style="text-align:center; margin-bottom:5px;"> Image Gallery Title Here </h2>
<div class="book_grid">
<div class="child"><a href="#"><img src="https://blogger.googleusercontent.com/img/b/R29vZ2xl/AVvXsEg1pyZ1dM2QIeNa_i6EJ77cHBe9aUA7cae8NDTIlpqoTolL3gVOQbB-X9BCNoG86870g_kCN3ThGzQQFFkbK7l-dtYpg1zRx0ATwG4dZ7JATQH31XEjMRt2gaONQeITxuqCww7zuqopnkmW6uwuDfB4e-8hr2g29WVRxQXeqL81s1KcFJhjdx_ePRR92g9r/s1600/pexels-esmihel-muhammad-15599167.jpg" /></a> </div>
<div class="child"><a href="#" ><img src="https://encrypted-tbn0.gstatic.com/images?q=tbn:ANd9GcQx4jDm9cObbF54HQdpUjbFWV5d5n7EekciKw&usqp=CAU" /></a></div>
<div class="child"><a href="#" ><img src="https://encrypted-tbn0.gstatic.com/images?q=tbn:ANd9GcTziAJcxmw1pvvR1UfYhTonlbY4KZ08pGLKiw&usqp=CAU" /></a></div>
<div class="child"><a href="#" ><img src="https://images.pexels.com/photos/4552789/pexels-photo-4552789.jpeg?auto=compress&cs=tinysrgb&dpr=1&w=500" /></a></div>
  <div class="child"><a href="#" ><img src="https://encrypted-tbn0.gstatic.com/images?q=tbn:ANd9GcTziAJcxmw1pvvR1UfYhTonlbY4KZ08pGLKiw&usqp=CAU" /></a></div>
<div class="child"><a href="#" ><img src="https://encrypted-tbn0.gstatic.com/images?q=tbn:ANd9GcQx4jDm9cObbF54HQdpUjbFWV5d5n7EekciKw&usqp=CAU" /></a></div>
<div class="child"><a href="#" ><img src="https://images.pexels.com/photos/4552789/pexels-photo-4552789.jpeg?auto=compress&cs=tinysrgb&dpr=1&w=500" /></a></div>
  <div class="child"><a href="#"><img src="https://images.pexels.com/photos/9503239/pexels-photo-9503239.jpeg?cs=srgb&dl=pexels-jeremille-k-9503239.jpg&fm=jpg" /></a> </div>
</div>
</div>
3. Here, You need to add your own Image URL and You can add a clickable link on the image as well by replacing the #.
Here, I have highlighted the First image URL.
4. Now you need to paste the CSS code. You can either directly use this on the same blog post or paste it in the theme code to use it on multiple pages. Just use it above the closing body tag. (</body>)
<style>
 .book_grid{
  display: grid;
  grid-template-columns: repeat(4, 1fr);
  grid-column-gap: 4px;
  grid-row-gap: 4px;
}
.book_grid img{
    width: 100%;
    height: 260px!important;
    object-fit: cover;
    padding: 0px 4px;
}

  @media screen and (max-width: 896px){
.book_grid {
   grid-template-columns: repeat(3, 1fr);
}
}

@media screen and (max-width: 640px){
.book_grid {
   grid-template-columns: repeat(2, 1fr);
}
}
  @media screen and (max-width: 480px){
.book_grid {
   grid-template-columns: repeat(1, 1fr);
}}
</style>
5. Now You have successfully added an image gallery to your Blogger website. Make sure to adjust the Image width and height according to your needs.
If you have any doubt, you can ask in the comment section. For More Tutorials Like this, Don’t forget to Follow our YouTube channel.
Read Also: How to Add a Masonry Grid for an Image Gallery in Blogger


Hi! Abhishek Bhaiya,
kiya aap blogger ki Theme Development sikha saktay hain?