How to Add a Custom Cursor to WordPress and Blogger Website using CSS?
In this article, You will learn how to add a custom cursor effect to the Website and make your website look more professional.
This is super helpful for Portfolio and design websites but you can use it on any website without compromising on the speed performance.
To change the cursor effect, you need to add a small CSS code to your website. This is done with the CSS cursor property.
What is the Cursor property in CSS?
The cursor property of CSS allows us to specify the type of cursor shown on the webpage.
There are more than 36 cursor properties that you can use in the CSS like alias, auto, copy, crosshair, grab, etc.
By default, most websites use the default auto cursor property, but in this tutorial, you will learn how to add a custom cursor property by adding an icon through the URL.
Video Guide

How to Add Custom CSS Cursor in Blogger?
To add the custom Cursor in Blogger follow the below steps.
- Go to the Blogger dashboard and click on the Theme section.
- Take a backup of your theme and click on the Edit HTML option.
- Now scroll down to the bottom and search for the </body> tag.
- Now paste the below CSS code and paste it just above the </body> tag.
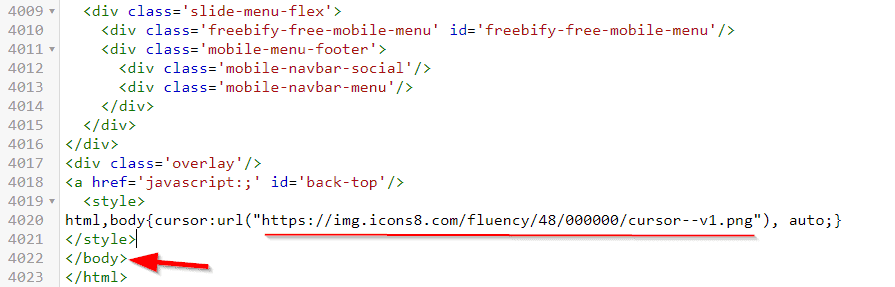
<style>
html,body{cursor:url("https://img.icons8.com/fluency/48/000000/cursor--v1.png"), auto;}
</style>
Now your custom CSS cursor is added to the Blogger website.
Here, you can further change the cursor icon of your own by changing the URL field in the CSS code.
How to Add Custom CSS Cursor in Wordpress?
To add the custom CSS cursor in Wordpress follow the below step.
Step 1: Go to the WordPress dashboard and click on the Appearance > Customize option.
Step 2: Now click on the Additional CSS section and paste the below code in it.
Step 3: Now save the code and the custom cursor is applied to your wordpress website.
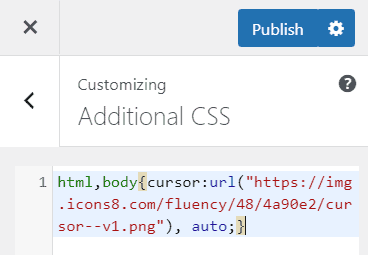
html,body{cursor:url("https://img.icons8.com/fluency/48/4a90e2/cursor--v1.png"), auto;}Note: Here you don’t need to add the style tag as you are pasting the code on the CSS stylesheet.
Here you can change the Icon of the CSS cursor by changing the URL.
To get the icons for your CSS cursor you can use some websites given below.
I hope you got the idea of how to add a custom cursor effect to both Blogger and Wordpress websites.
Advanced Custom Mouse Cursor Effect For Wordpress & Blogger

If you want to Add an Advanced Custom Mouse Cursor Effect then you can use the below code in the Footer section of your Website.
If you are using Wordpress, You can open the theme editor and search for the Footer.php file and paste the code above the </body> tag.
If you are using Blogger CMS, then you can go to Theme > Edit HTML and scroll down to the end to find the </body> tag.
Code snippet for Custom Mouse Cursor
<link rel="stylesheet" href="https://unpkg.com/kursor/dist/kursor.css">
<script src="https://unpkg.com/kursor"></script>
<script>
	new kursor({
		type: 1,
		color: '#000000',
		removeDefaultCursor: false,
	})
</script>
Here, You can make further Adjustments Like changing the type from 1 to 5 and Changing the color and you can also disable the existing mouse cursor on your website.
Follow the above video to learn more about this.
If you have any doubts regarding this, you can ask me in the comment section or you can join our Telegram discussion Group.


hello sir, I became fan of your style, no plugin just code, super cool
but I have a problem with this one, when i click one of link, it shows default mouse (hand with finger)
i want to change color and size too
please healp
How to change the context, the image it follows, for example, when clicking on the link, it will show another icon?