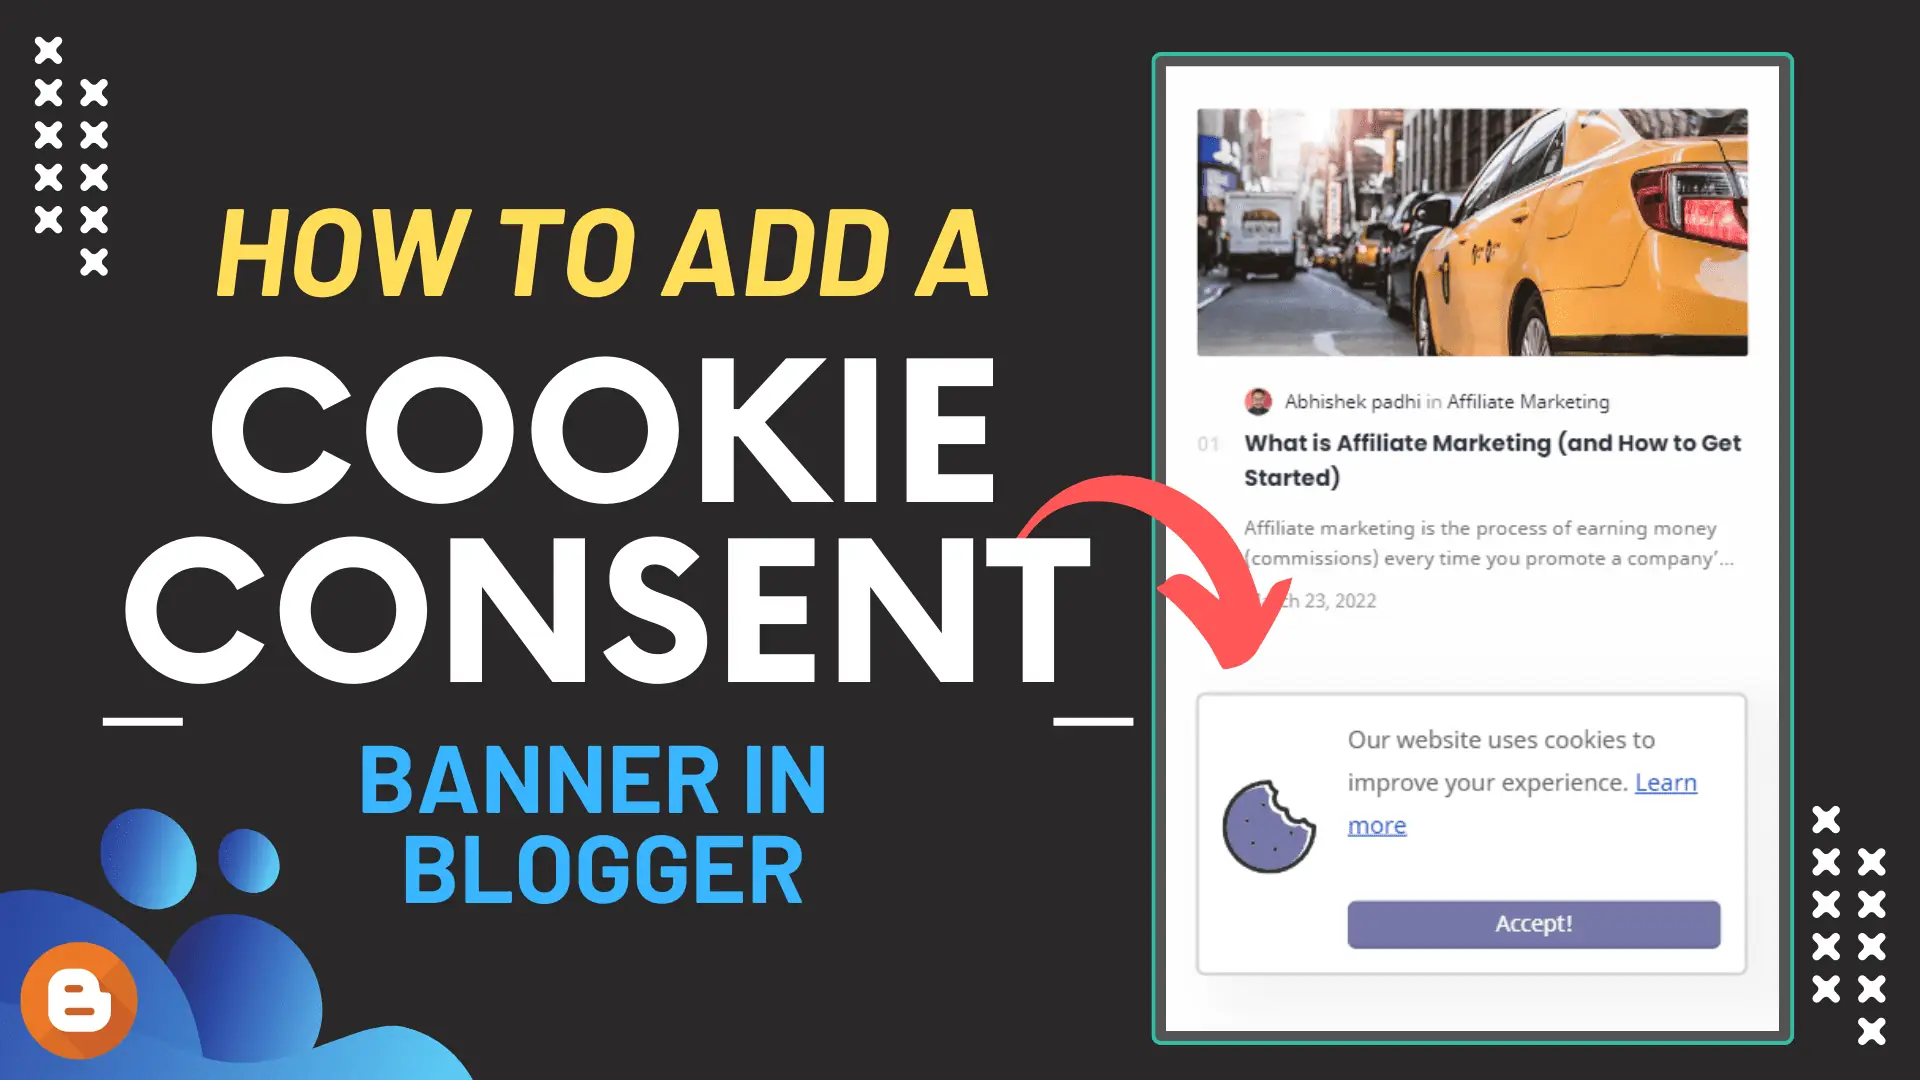
How to add a cookie consent banner on Blogger
When browsing the internet, you have probably come across a cookie consent banner that asks you to accept or reject cookies. These banners have become a standard feature on websites due to the increasing concern about data privacy and online tracking.
If you are a blogger using Blogger, it is essential to add a cookie consent banner to your site to ensure compliance with regulations such as the General Data Protection Regulation (GDPR) and the California Consumer Privacy Act (CCPA).
What is a cookie consent banner?
A cookie consent banner is a pop-up window or banner that appears on a website, informing users about using cookies and asking for their consent to store or access their information.
What are cookies, and how do they work?
Cookies are small text files that are placed on a user’s device when they visit a website. They are used to remember user preferences, track website activity, and provide a more personalized experience. However, cookies can also be used for targeted advertising or tracking, which is why users must be informed and given a choice to accept or reject them.

Imagine you visit a website, like an online store. When you go there, the website sends a small piece of information to your computer or phone, and that piece is called a “cookie.” It’s not an actual cookie you can eat; it’s just a tiny file.
Now, this cookie’s job is to remember things about your visit. For example, it might remember what items you put in your shopping cart or if you’ve visited the site before. It’s like a little note that the website leaves on your device to remember your preferences.
So, when you come back to the website later, it checks for the cookie on your device. If it finds it, the website knows, “Hey, this person has been here before, and they liked these things.” It helps the website show you personalized content or remember your login details.
Cookies are used by many websites to make your online experience smoother and more tailored to you. They work as tiny messengers between your device and the websites you visit, carrying information to make your internet life a bit more convenient.
Adding a cookie consent banner to your Blogger site is a relatively simple process that can be completed in a few steps. In the following sections, we will outline the steps to add a cookie consent banner on Blogger
How to add a cookie consent banner on Blogger
To Add a cookies consent Banner or Popup in Blogger, follow the steps below.
- Open your Blogger dashboard and Go to the Theme section.
- Now click on the ‘Edit HTML‘ section from the drop-down menu just the right side of the customize button.
- Now search for the closing Body tag (</body>) That is generally the 2nd last line of your theme code.
- Now paste the given code just above it and save the code to add the cookie consent banner to your Blogger website.
<div class='cookie-box'>
    <div class='cookie-row'>
     <div class='cookie-img'><svg viewBox='0 0 97.93 97.93' xmlns='http://www.w3.org/2000/svg'><path d='M44,23.76a2.47,2.47,0,1,0,.91,3.37A2.47,2.47,0,0,0,44,23.76Z'></path><path d='M25.9,40.32a2.47,2.47,0,0,0,0,4.93h0a2.47,2.47,0,1,0,0-4.93Z'></path><circle cx='32.08' cy='65.86' r='2.47'></circle><path d='M56.38,69.91a2.47,2.47,0,1,0,1.14,1.49A2.47,2.47,0,0,0,56.38,69.91Z'></path><path d='M72,52.68a2.47,2.47,0,0,0-2.38,1.83,2.44,2.44,0,0,0,.25,1.87,2.47,2.47,0,0,0,4.52-.59,2.44,2.44,0,0,0-.25-1.87A2.47,2.47,0,0,0,72,52.68Z'></path><path d='M89.51,52.86A14,14,0,0,1,81,47.2,14.09,14.09,0,0,1,61,35.68,14.09,14.09,0,0,1,49.49,15.73a14,14,0,0,1-5.66-8.55,44,44,0,0,0-21.09,6.15A44.26,44.26,0,0,0,71.46,87.08,44.24,44.24,0,0,0,89.51,52.86ZM28.28,43.42a2.47,2.47,0,0,1-2.38,1.83h0a2.47,2.47,0,1,1,2.38-1.83Zm3.8,24.9a2.47,2.47,0,1,1,2.47-2.47A2.47,2.47,0,0,1,32.08,68.32ZM44.92,27.13A2.47,2.47,0,1,1,44,23.76,2.47,2.47,0,0,1,44.92,27.13ZM57.28,73.27a2.47,2.47,0,1,1-.9-3.36,2.47,2.47,0,0,1,.9,3.36ZM74.42,55.79a2.47,2.47,0,1,1-.25-1.87A2.45,2.45,0,0,1,74.42,55.79Z' fill='#7577a9'></path><path d='M97.93,48.52v-.2A2.35,2.35,0,0,0,95.7,46a9.37,9.37,0,0,1-8-5.45,2.35,2.35,0,0,0-3.49-.93,9.51,9.51,0,0,1-5.44,1.72A9.4,9.4,0,0,1,69.39,31.1a2.35,2.35,0,0,0-2.55-2.55c-.28,0-.57,0-.85,0a9.39,9.39,0,0,1-7.68-14.81,2.35,2.35,0,0,0-.93-3.49,9.37,9.37,0,0,1-5.45-8A2.35,2.35,0,0,0,49.61,0H49a49,49,0,1,0,49,49C97.93,48.82,97.93,48.67,97.93,48.52ZM71.46,87.08A44.26,44.26,0,0,1,22.74,13.33,44,44,0,0,1,47.53,4.72a14,14,0,0,0,5.66,8.55A14.09,14.09,0,0,0,64.71,33.22,14.09,14.09,0,0,0,84.66,44.75a14,14,0,0,0,8.56,5.66A44.3,44.3,0,0,1,71.46,87.08Z'></path></svg></div>
    <div class='cookie-content'>
      <p>Our website uses cookies to improve your experience. <a href='https://policies.google.com/technologies/cookies' target='_blank' title='Learn more'>Learn more</a></p>
 <button class='cookie-buttons'>Accept!</button>
</div>
</div>
</div>

<style>
  .cookie-box.hide{display:none}
.cookie-box {
    position: fixed;
    width: 90%;
    margin: 20px;
    max-width: 400px;
    min-height: 100px;
    background-color: #ffffff;
    box-shadow: 25px 12px 25px 12px rgb(30 30 30 / 4%);
    z-index: 990;
    border: 2px solid lightgrey;
    border-radius: 6px;
    bottom: 15px;
    right: 0px;
    padding: 15px;
}
.cookie-row {
    position: relative;
    display: -webkit-box;
    display: -ms-flexbox;
    display: flex;
    text-align: left;
    align-content: center;
    justify-content: center;
    align-items: center;
}
.cookie-img{padding-right:20px}
.cookie-img svg{fill:#333;width:60px;height: 60px;}
.cookie-content p {
    position: relative;
    width: 100%;
    display: inline-block;
    font-size: 15px;
    color: #666666;
    margin-top: 0!important;
}
.cookie-content p a{text-decoration:underline;}
.cookie-buttons {
    position: relative;
    width: 100%;
    margin-top: 10px;
    float: left;
    background-color: #7577a9;
    font-family: inherit;
    font-size: 14px;
    color: #ffffff;
    text-decoration: none;
    opacity: 1;
    border: none;
    cursor: pointer;
    font-weight: 500;
    padding: 5px;
    border-bottom: 2px solid rgba(0,0,0,0.1);
    border-radius: 6px;
}
</style>

<script>//<![CDATA[
    cookieChoices = {};
    const cookieBox = document.querySelector(".cookie-box"),
    acceptBtn = cookieBox.querySelector("button");
    acceptBtn.onclick = ()=>{
      document.cookie = "CookieByKey2Blogging; max-age="+60*60*24*30;
      if(document.cookie){
        cookieBox.classList.add("hide");
      }else{
        alert("Cookie can't be set! Please unblock this site from the cookie setting of your browser.");
      }
    }
    let checkCookie = document.cookie.indexOf("CookieByKey2Blogging");
    checkCookie != -1 ? cookieBox.classList.add("hide") : cookieBox.classList.remove("hide");
  //]]></script>
This code will remove the default Blogger cookie Notification and add a custom cookie consent banner or you can say popup to your blogger website.
This code is fully optimized and uses SVG codes so you don’t have to worry about site speed on the blogger website.
Conclusion
In conclusion, adding a cookie consent banner to your Blogger site is essential for ensuring compliance with data privacy regulations and providing transparency to your users.
I hope this article helps you add a custom cookie consent widget to your blogger website. If you have any issues with this code, do let me know in the comment section.


Thank you for the article, that is a great information.
Bro in my template there no is showing. Please say how to add.
Do we need to have this cookie consent for blog on wordpress also?
Yes, you can use it in wordpress as well