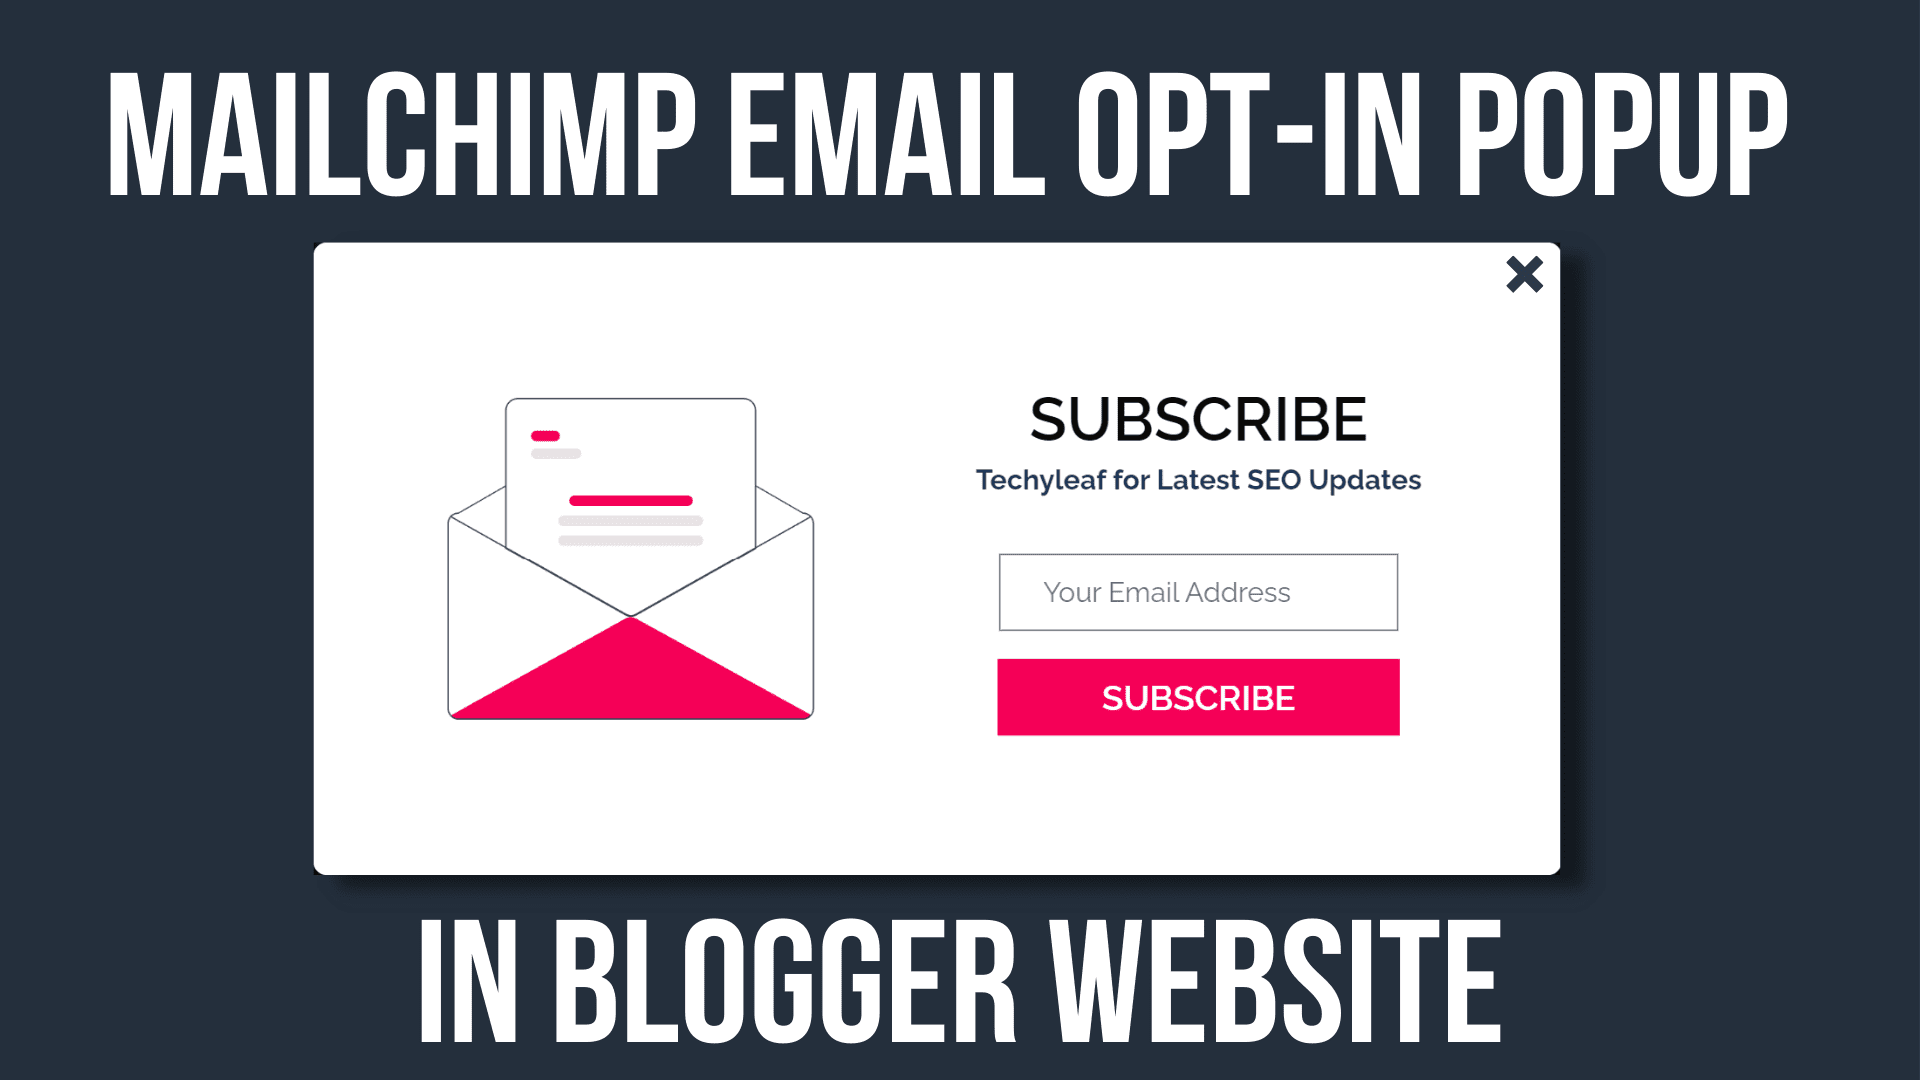
How To Add An Email Subscription Popup to Blogger (via Mailchimp)
Do you want collect Emails from your Website visitors and send personalized messages directly to their inboxes? well, follow this step-by-step tutorial for how to do this.
Email Marketing is one of the most effective ways to connect with the audience, get more traffic to the sites, and pitch products and services to your audience.
So, for this, you need email marketing tools like Mailchimp, convertkit, and an email signup form that will connect your website to these tools. You can either use a Signup form or a subscription popup to your website.
The subscription popup is more effective than the traditional signup form as it draws the user’s attention by popping up on the screen. Users can easily join your email list by giving their names and email addresses in the field.
After that, the Email address will be added to your Email marketing tool and you can then send customized Emails to your subscribers and give them updates about your new post or products.
If you want to do affiliate marketing through emails then you can also consider Email autoresponders where you can automate different processes and generate better results.
ok, let’s check how you can add an Email subscription popup to your Blogger website and integrate it with your Mailchimp account.
Steps to Add Email Subscription Popup in Blogger
To add an Email subscription popup in Blogger, follow the below steps.
- Go to your Blogger dashboard and click on the theme section.
- Now click on the Edit HTML section and find the </body> tag.
- Then paste the given code above it and replace the Mailchimp form action link on it.
- Now save the code and the Email subscription popup is added to your Blogger website.
<style>
.email-subscription-overlay {display: flex;align-items: center;justify-content: center;position: fixed;top: 0;left: 0;width: 100%;height: 100vh;background: rgba(0, 0, 0, 0);z-index: -100;transition: all 400ms;}
.email-subscription-overlay.active {background: rgba(0, 0, 0, 0.9);z-index: 200;}
.email-subscription-container {background: #fff;padding: 32px;text-align: center;display: flex;box-shadow: 0 2px 12px 3px rgba(0, 0, 0, 0.3);border-radius: 8px;transform: translateY(-200px);opacity: 0;transition: all 200ms;}
.email-subscription-overlay.active .email-subscription-container {transform: translateY(0);opacity: 1;}
.email-subscription-container form {display: flex;flex-direction: column;margin-top: 32px;}
.email-subscription-overlay .email-close-btn {top: 24px;right: 24px;position: fixed;font-size: 50px;font-weight: 600;color:#eee;background: none;border: none;cursor: pointer;pointer-events: none;transition: all 400ms;opacity: 0;}
.email-subscription-overlay.active .email-close-btn {opacity: 1;pointer-events: auto;}
.email-subscription-container img {width: 300px;object-fit: contain;}
.email-subscription-container h2 {font-size: 35px;text-transform: uppercase;margin-bottom: 15px;margin-top: 12px;color: #0a0908;}
.email-subscription-container p {margin-top: 10px;font-weight: bold;color: #1d3557;font-size:16px;}
.email-subscription-container .text-content {padding: 48px;}
.email-subscription-container form .email-input-field {margin-bottom: 16px;padding: 12px 24px;font-size: 16px;border: 1px solid #777;}
.email-subscription-container form .email-submit-btn {background: #f50057;border: none;font-weight: 600;font-size: 20px;color: #fff;padding: 10px 60px; cursor: pointer;text-transform: uppercase;transition: all 400ms;}
.email-subscription-container form .email-submit-btn:hover {background: #069b7a;}
@media (max-width: 800px) {.email-subscription-container {flex-direction: column;width: 400px;align-items: center;}.email-subscription-container .text-content {padding: 0;width: 100%;}}
@media (max-width: 500px) {.email-subscription-container {width: 75%;}}
#mc_embed_signup div.mce_inline_error {margin: 0 0 1em 0;z-index: 1;color: #000;}
#mc_embed_signup div.mce_inline_error {padding: 5px 10px;font-weight: bold;background-color: white;}
.response {font-weight: 600;color: black;margin: -5px 0 5px 0;}
</style>
<!-- Email Subscription Popup-->
<div class='email-subscription-overlay'>
<button class='email-close-btn'>×</button>
<div class='email-subscription-container'>
<img alt='email-signup-form-Image' src='https://blogger.googleusercontent.com/img/b/R29vZ2xl/AVvXsEj9TPAOsLb2-sDqk1TUCfkg_Qj2vnK9KnDPPEd94_TKlHtTw6iVhMMwIG7NjdQYseYXG4cCsdNKhkM7zEEe9qwrORpFvQ54cgqDViw7SSXEVFraofdZItMXStgo_2z_LJCXEebwopU0Pf7FWPAlaBkuxjibbvn8zmTLZZ9X81LYFsqUZU4eIjSs6MHJFw/s1600/undraw_Opened_re_i38e%20%281%29.png'/>
<div class='text-content'>
<h2>Subscribe</h2>
<p>Techyleaf for Latest SEO Updates</p>
<div class='container'>
<div id='mc_embed_signup'>
<form action='#' class='validate' id='mc-embedded-subscribe-form' method='post' name='mc-embedded-subscribe-form' target='_blank'>
<div id='mc_embed_signup_scroll'><div class='mc-field-group'><input class='email-input-field required email' id='mce-EMAIL' name='EMAIL' placeholder='Your Email Address' type='email' value=''/></div>
<div class='clear' id='mce-responses'><div class='response' id='mce-error-response' style='display:none'/><div class='response' id='mce-success-response' style='display:none'/>
</div><!-- real people should not fill this in and expect good things - do not remove this or risk form bot signups-->
<div aria-hidden='true' style='position: absolute; left: -5000px;'><input name='b_ac52e8b1ce2a06907e0091d7c_63bf572981' tabindex='-1' type='text' value=''/></div>
<div class='clear'><input class='email-submit-btn subscribe' id='mc-embedded-subscribe' name='subscribe' type='submit' value='Subscribe'/></div>
</div></form></div>
<script src='//s3.amazonaws.com/downloads.mailchimp.com/js/mc-validate.js' type='text/javascript'/><script type='text/javascript'>(function($) {window.fnames = new Array(); window.ftypes = new Array();fnames[0]='EMAIL';ftypes[0]='email';fnames[1]='NAME';ftypes[1]='text';}(jQuery));var $mcj = jQuery.noConflict(true);</script>
</div></div></div></div>
<script>
const emailSubscriptionOverlay = document.querySelector(".email-subscription-overlay");
const emailCloseButton = document.querySelector(".email-close-btn");
setTimeout(() => {
if (!localStorage.getItem('popupClosed')) {
emailSubscriptionOverlay.classList.add("active");
localStorage.setItem('popupClosed', 'true');
}
}, 3000);
emailCloseButton.addEventListener("click", () => {
emailSubscriptionOverlay.classList.remove("active");
});
</script>How to integrate Mailchimp with the Popup form?
You need to change the form action link (Replace the # ) with your Mailchimp URL. (i.e. <form action=’#’ class=’validate’).
To get this link, you need to signup for a free account with a MailChimp account and create a signup form there. After that, you need to extract the form action link from that code. Follow the video tutorial to check it step by step.

How to customize the Popup Signup form?
If you are using Themes like Median UI or Fletro pro theme then it may not work properly on mobile devices. You need to adjust the Popup width in the CSS code for that.
@media (max-width: 500px) {.email-subscription-container {width: 75%;}}Find this code and change the container width from 75% to 85% like this.
You also need to change the h2 and paragraph tag (highlighted Above) used in the above code. Just change the text according to your website.
I have also shown how to change the popup shown duration in the video tutorial. By default, it is set to 3 seconds. So, the popup will load after 3 sec of page load.
If you want to change the image then just search for email-signup-form-Image and then change the Source URL (src) of the image. First, upload the image to your Blogger website, and then get the image URL by right-clicking on the image.
You can also check out the alternate ways to integrate Mailchimp with Blogger here.
Conclusion
I hope you have successfully added the Popup signup form to your Blogger website and integrated Mailchimp to collect the email addresses of your visitors.
If you still have any doubts, feel free to ask me in the comment section.


Hi There,
I have just followed your instructions and the form pops up on the screen. All good there but when you add an email address to the subscription box and hit ‘subscribe’ it just does nothing. The button is not working? When you hover over the button it turns green but nothing happens when you click on it.
What can I do to fix this please?
Many thanks
Did you replace the Form Action Link From your Mailchimp Account ??
Please can’t i use Feedburner instead of mailchimp?
Feedburner service is no longer active by Google For Email Newsletter
Sir Aik Baar Nahi Kiya Subscribe , Phir Refresh karne par bhi nahi khol raha
hi, Abhishek how are you.
can you explain how I can make it possible to open all blog posts in a new tab?
when someone opens any post it should be open in the new tag.
For this, you need to add target=”_blank” like this on the anchor tag. There is no other option available for this. You can also use a plugin called Open Links In New Tab by Reza Khan. It’s available in the Wordpress plugin directory.