How to Lazyload Analytics in Wordpress (Easy Guide)

In this article, you will learn how to Lazyload Google Analytics code on your Wordpress website.
So, let’s understand what is lazyloading and why you should implement this on your website.
Lazy loading is a technique to load heavy resources after the page load and improve the loading speed. Here, the javascript will not load at the beginning and it doesn’t block the critical resources.
It will only load after the page loads and when the user starts interacting with the webpage like scrolling the page.
So, in this way, you can reduce the overall page size of a webpage, prioritize critical resources at the beginning, and load heavy scripts after some time. So, this will also help you in achieving core web vitals on the website.
As the Google Analytics code is a javascript, it needs to be rendered by the browser which causes the slow down of loading speed.
To counter this, you can replace your existing analytics code with the lazyload analytics code and improve your Wordpress website loading speed.
so, let’s check the process step by step.

How to Lazyload Analytics in wordpress
To lazyload Google Analytics in Wordpress, open the dashboard and open the location where you have installed the default tracking code.
Here, copy the analytics tracking code and replace it with the given code.
<script type='text/javascript'>//<![CDATA[
var lazyanalisis=!1;window.addEventListener("scroll",function(){(0!=document.documentElement.scrollTop&&!1===lazyanalisis||0!=document.body.scrollTop&&!1===lazyanalisis)&&(!function(){var e=document.createElement("script");e.type="text/javascript",e.async=!0,e.src="https://www.googletagmanager.com/gtag/js?id=G-3RKGDVCG9C";var a=document.getElementsByTagName("script")[0];a.parentNode.insertBefore(e,a)}(),lazyanalisis=!0)},!0);
//]]></script>
<script>
//<![CDATA[
  window.dataLayer = window.dataLayer || [];
  function gtag(){dataLayer.push(arguments);}
  gtag('js', new Date());
  gtag('config', 'G-3RKGDVCG9C');
//]]>
</script>
Now paste the new code in the footer section of your Wordpress website. Here, you can either directly paste it in the theme file editor > Footer.php or you can use a code management plugin.
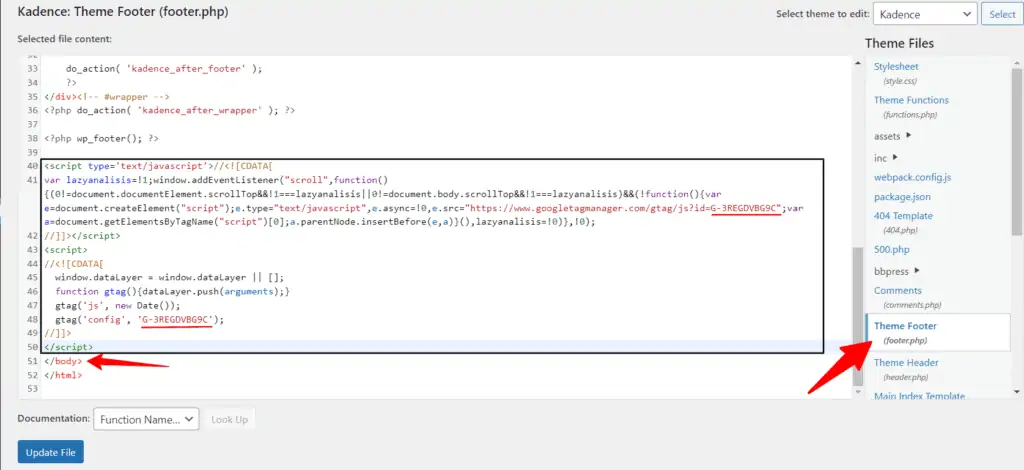
so, here I will use the Header footer code manager plugin by 99Robots.

Install and activate this plugin and add the code snippet. So, go to the plugin settings and click on Add New Snippet. Here, Add a snippet name and add the snippet Type to “javascript“.
Now Add the Site Display to “Site Wide” and set the location to “Footer“. Now paste the given code in the code box and save the code.
Don’t forget to replace the tracking ID two times in the lazyload script.
Now, your Lazyload analytics code is installed on the Wordpress website. After that, you will not see any error about analytics in the page speed insight tool.
If you want to improve your wordpress loading speed, I recommend you to use the Litespeed cache plugin. It is a free but powerful plugin for speed optimization.
If you have any trouble during this process, you can ask me in the comment section. You can also join our Telegram Group for discussion.


Wonking Fine
Thanks you….
thanks for sharing; for blogger what would be the way
Lazyload analytics in Blogger video tutorial: Watch on YouTube